Nativity Scene 3D Layered Papercut – A Unique Way to Elevate Your Christmas Decor
When it comes to holiday decorations, the Nativity Scene 3D Layered Papercut stands out as a creative and meaningful addition to your festive display. This intricate design not only captures the essence of the Nativity but also brings a sense of depth and artistry that traditional flat paper crafts can't match. Whether you're an experienced crafter or someone looking to infuse their celebrations with personal touches, this project offers a rewarding blend of tradition and innovation.
What Is the Nativity Scene 3D Layered Papercut?
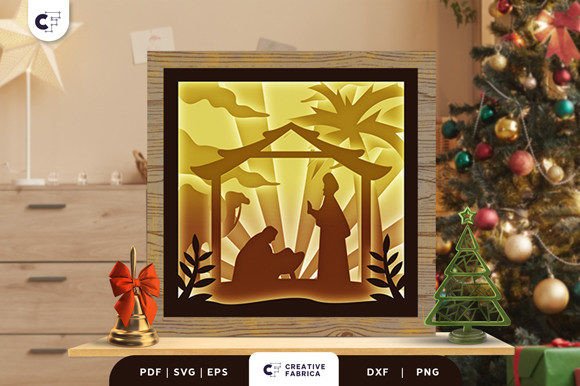
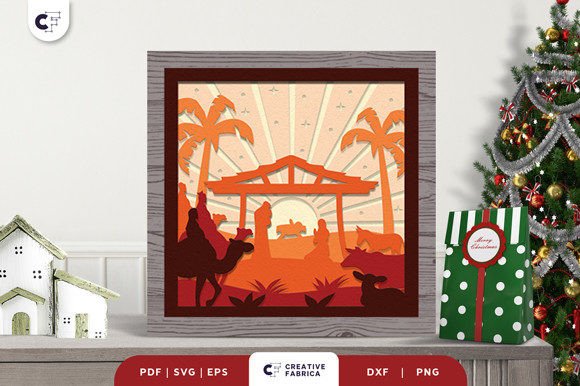
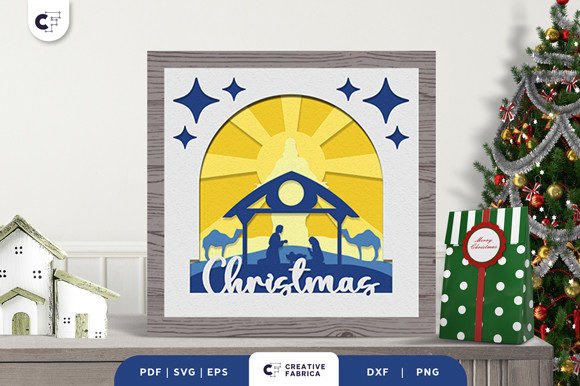
The Nativity Scene 3D Layered Papercut is a shadow box-style decoration crafted from multiple layers of cardstock arranged in a specific sequence to create a three-dimensional effect. The design typically features an arched frame above the manger, praying figures, and a silhouette of a hut over the desert with a camel on one side. These elements are layered precisely to form a surreal and grand visual representation of the birth of Jesus.
This type of papercut artwork is ideal for those who want to celebrate Christmas with a unique, handcrafted touch while maintaining a religious theme. It's especially popular among educators, bloggers, small business owners, and hobbyists who appreciate both spiritual symbolism and artistic expression.
Why Choose a 3D Layered Papercut?
Creating a Christmas ornament like the Nativity Scene 3D Layered Papercut allows you to add a visually captivating element to your decor without requiring advanced artistic skills. The use of a cutting machine simplifies the process, making it accessible even to beginners. Moreover, the final product looks professional and elegant, which makes it perfect for gifting or showcasing in public spaces such as churches, schools, or community centers.
Materials You’ll Need
- Paper: The design is best printed on high-quality cardstock like Encore Cardstock (80 lb cover, 216 gsm), known for its durability and smooth finish.
- Cutting Machine: A Cricut or similar device will be essential for accurately cutting the intricate shapes. Ensure your machine supports SVG, PDF, EPS, PNG, and DXF formats.
- Adhesive: Use strong yet clear adhesive to layer the pieces without obscuring the details.
- Frame: A shadow box frame provides structure and enhances the 3D effect. Consider adding LED strips around the frame for illumination, transforming the piece into a lightbox.
Preparation Tips for a Smooth Workflow
Before diving into the actual cutting and assembling, take time to organize your materials and workspace. Here’s how to prepare effectively:
- Select the Right Paper: While the design works well with various papers, using 80 lb cardstock ensures crisp lines and long-lasting results. If you’re purchasing supplies, visit the 12×12 Cardstock Shop for reliable stock options.
- Download the Design Files: Obtain the design in SVG, PDF, EPS, PNG, or DXF format. These file types are compatible with most cutting machines and software platforms.
- Plan the Layers: The Nativity Scene 3D Layered Papercut consists of six distinct layers. Arrange them in order before starting the cutting process to avoid confusion during assembly.
- Calibrate Your Cutting Machine: Adjust settings based on the thickness and type of cardstock you're using. Proper calibration prevents incomplete cuts or damage to delicate parts of the design.
Implementing the Design Into Your Creative Process
Incorporating the Nativity Scene 3D Layered Papercut into your workflow is straightforward if you follow a few key steps. Begin by importing the design into your preferred cutting software. Once loaded, review each layer carefully and make any necessary adjustments to fit your desired size—typically 20.32×20.32 cm for standard frames.
Next, load the cardstock into your cutting machine and execute the cuts. After all layers are ready, assemble them by placing each one on top of the previous, aligning carefully. Secure the layers with adhesive, ensuring no shifting occurs. Finally, mount the assembled piece in a shadow box frame and install LED strips around the edges for a glowing effect.
This method works well for batch production if you're creating multiple ornaments for gifts or events. Just remember to allow adequate drying time between layers and maintain consistent alignment throughout the process.
Integration With Other Tools and Resources
To maximize efficiency, consider integrating the Nativity Scene 3D Layered Papercut with other tools and resources commonly used in crafting workflows:
- Digital Design Software: Programs like Adobe Illustrator or Cricut Design Space can help you customize the design further, adjust colors, or combine it with additional patterns.
- Lighting Accessories: Adding LED strips or mini lights can elevate the ambiance of the finished piece. These are available at most craft stores and can be easily installed within the frame.
- Decorative Elements: Enhance the scene by incorporating glitter, metallic paints, or tiny stickers to highlight specific areas like stars or halos.
- Storage and Organization: For future projects, store unused layers or components in labeled containers to preserve their quality and streamline access when needed.
Use Cases Across Different Scenarios
The Nativity Scene 3D Layered Papercut isn’t just a standalone ornament; it can be integrated into various scenarios:
Home Decoration
Hang the completed shadow box near a window or place it on a mantel to create a warm, religious ambiance. Its 3D nature draws attention and adds a touch of sparkle to your Christmas Eve celebration.
Event Planning
If you're organizing a church service, school event, or family gathering, these papercuts can serve as table centerpieces or backdrops. Their grand appearance complements themed decorations and helps set the tone for a meaningful holiday experience.
Gift Giving
Handmade decorations have a special charm. Assemble several copies of the Nativity Scene 3D Layered Papercut and gift them to friends, family, or colleagues. Each piece reflects your effort and care, making it a thoughtful holiday present.
Teaching and Learning Activities
Educators can use this project as part of a lesson plan involving history, art, or religious studies. Students enjoy learning about the significance of the Nativity while developing practical crafting skills.
Long-Term Use and Quality Control
With proper care, the Nativity Scene 3D Layered Papercut can be reused for years. To ensure longevity, store it in a dry place away from direct sunlight. Avoid using overly thick adhesives that might yellow over time.
During the creation process, always double-check the alignment of each layer. Even minor misalignments can affect the overall look. Also, keep in mind that the final product’s color may vary slightly due to differences in lighting sources and the inherent properties of the paper used. Preview images are helpful, but they should not replace hands-on testing with your chosen materials.
Observations From Real-World Applications
Many creators have found that the complexity of the design encourages careful planning and execution. It's a great way to develop attention to detail and patience. Others note that using pre-made digital templates significantly reduces the learning curve, especially for those new to papercrafts.
Entrepreneurs and marketers often leverage this type of craft to engage audiences through DIY workshops or social media tutorials. It's a versatile asset that can be adapted for different platforms and purposes, from content creation to product offerings.
Final Thoughts
The Nativity Scene 3D Layered Papercut is more than just a decorative item—it’s a meaningful way to celebrate the season with craftsmanship and creativity. By understanding the materials, processes, and integration possibilities, you can smoothly incorporate this project into your own workflow, whether for personal enjoyment, educational value, or commercial ventures. With a little preparation and attention to detail, you can transform a simple cut-out into a stunning centerpiece that brings joy and reverence to your Christmas festivities.